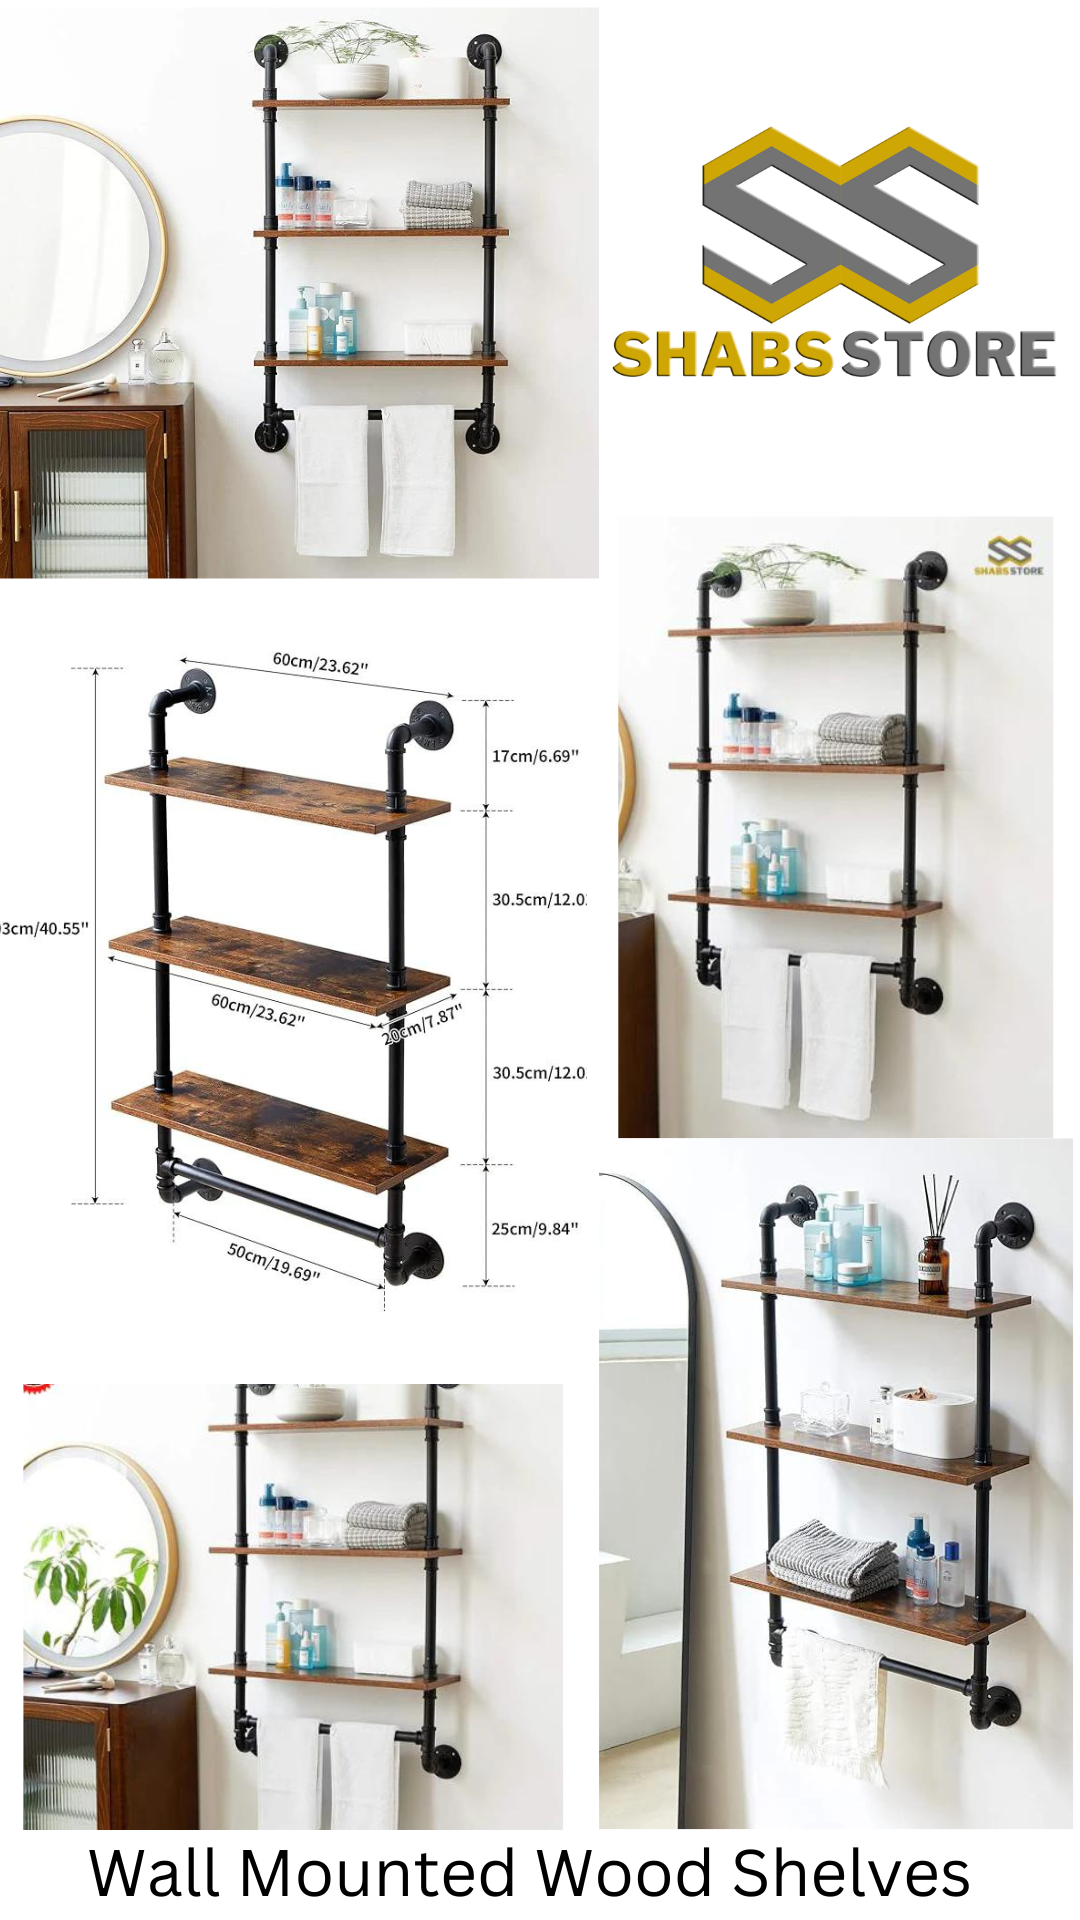
A Comprehensive Guide to Installing Toilet Accessories Holder Shelves
Making the most of the space in the bathroom is crucial to setting up a neat and practical area. Toiletries and other necessities may be conveniently stored while making the most of the space in the toilet by installing toilet accessory holder shelves. We’ll provide you detailed directions in this thorough tutorial to make sure you install these shelves effectively
Step 1: Assemble Your Supplies
Prior to starting the installation, collect all required materials:
Shelves holding toilet accessories
Hardware for mounting (screws, anchors)
Drill or screwdriver
Pencil
Level
Tape measure
Step 2: Select the Perfect Site
Choose the best spot for the shelves holding toilet accessories above the toilet. Make sure there is adequate space between the ceiling orany adjacent fixtures and the top of the toilet tank. Take into account the highest objects you intend to place on the shelf.
Step 3: Determine the Mounting Pointsand Mark Them
Measure the intended location for the shelves on the wall carefully using a pencil and tape measure. Mark the locations where the brackets or mounting hardware should be mounted. To make sure your markings are straight and aligned, use a level.
Step 4: Get the Wall Surface Ready
To achieve better adherence, clean the wall surface on which the shelves are to be installed. Wipe away any dust or dirt with a moist cloth. If the wall has been painted, make sure it is flawless and dry.
Step 5: Installing Mounting Hardware
Install the proper mounting hardware based on the mounting surface. If installing on drywall, provide further support using anchors. At the designated locations, drill pilot holes, place anchors, and fasten mounting brackets with screws.
Step 6: Put the Shelves in Place
Slide the shelves into the hardware or mounting brackets. Use a level to make sure they are level. If needed, reposition them to make sure they are straight and in line with the wall’s markings.
Step 7: Fasten the Shelves
After the shelves are positioned as desired, tighten the screws or bolts that came with the mounting hardware to make sure they stay in place. Make sure the shelves are anchored to the wall firmly and steadily.
Step 8: Test the Stability
To check if the shelves are stable, give them a little shake. Make sure they can sustain the weight of accessories such as toiletries without buckling or moving. Make any required modifications to increase stability.
Step 9: Arrange Accessories for theBathroom
Arrange products, towels, and other bathroom items on the shelf when they are firmly in place. To make the most of available space and guarantee simple access, arrange goods properly.
Step 10: Relish Your Well-OrderedBathroom
Take a step back and appreciate the shelves holding your newly placed toilet accessories. Savor the ease of having necessities arranged and conveniently located. Bid farewell to disorganized counters and welcome to well-organized bathrooms!
Are you sick of residing in chaos? In an era where possessions seem to multiply overnight and living spaces shrink by the minute, maintaining an organized home has become increasingly daunting. With accumulated belongings outpacing available storage space, many find themselves grappling with cluttered and chaotic environments. The necessity for efficient storage solutions has never been more apparent. Wooden home organizers emerge as a beacon of hope in this cluttered landscape, offering not just functionality but also aesthetic appeal.
“Organizing isn’t about perfection; it’s about efficiency, reducing stress and clutter, saving time and money, and improving your overall quality of life.” – Christina Scalise
In this article, we delve into the pressing issues of limited space and burgeoning possessions within households and advocate for wooden organizers’ transformative role in restoring order and harmony to our living spaces.
How to Get Inexpensive Home Organization Ideas at SHABSSTORE?
Ideas at SHABSSTORE?
Organize yourself without going over budget. Your home can be clutter-free with easy storage options like a wooden desk organizer or putting towels & bathrobes in a cabinet organizer. Yes, you have arrived at the right place; SHABSSTORE is the solution to all your home organization dreams..!
Step into the realm of exquisite craftsmanship and timeless elegance with our curated selection of wooden home organizing products. At our online store, every item is a testament to the mastery of woodworking artisans who infuse passion and precision into each piece. From sleek shelves to intricate drawer dividers, our collection showcases the versatility and beauty of wooden craftsmanship. Each product is meticulously crafted from high-quality wood, ensuring durability and longevity that stand the test of time. Whether you seek a minimalist solution for decluttering your living room or a sophisticated organizer for your study, our range offers a perfect blend of functionality and aesthetic appeal. Explore our online store and discover how our wooden organizers can elevate the style and efficiency of your home organization efforts.
Organize my House Checklist with SHABSSTORE:
Embark on a journey towards a harmonious and clutter-free home with the expertly crafted solutions offered by our store. As you navigate the maze of organizing dilemmas, our collection of wooden home organizers stands ready to transform your space into a haven of order and serenity. From versatile shelves to intricately designed storage bins, each item in our catalog reflects a commitment to excellence in both functionality and aesthetic appeal. Before delving into the comprehensive checklist for organizing your house, consider how our store’s products can serve as the cornerstone of your organizational endeavors, elevating every corner of your living space with elegance and efficiency.
Let’s explore our top 5 wooden picks to elevate the organization game of your sweet home..!
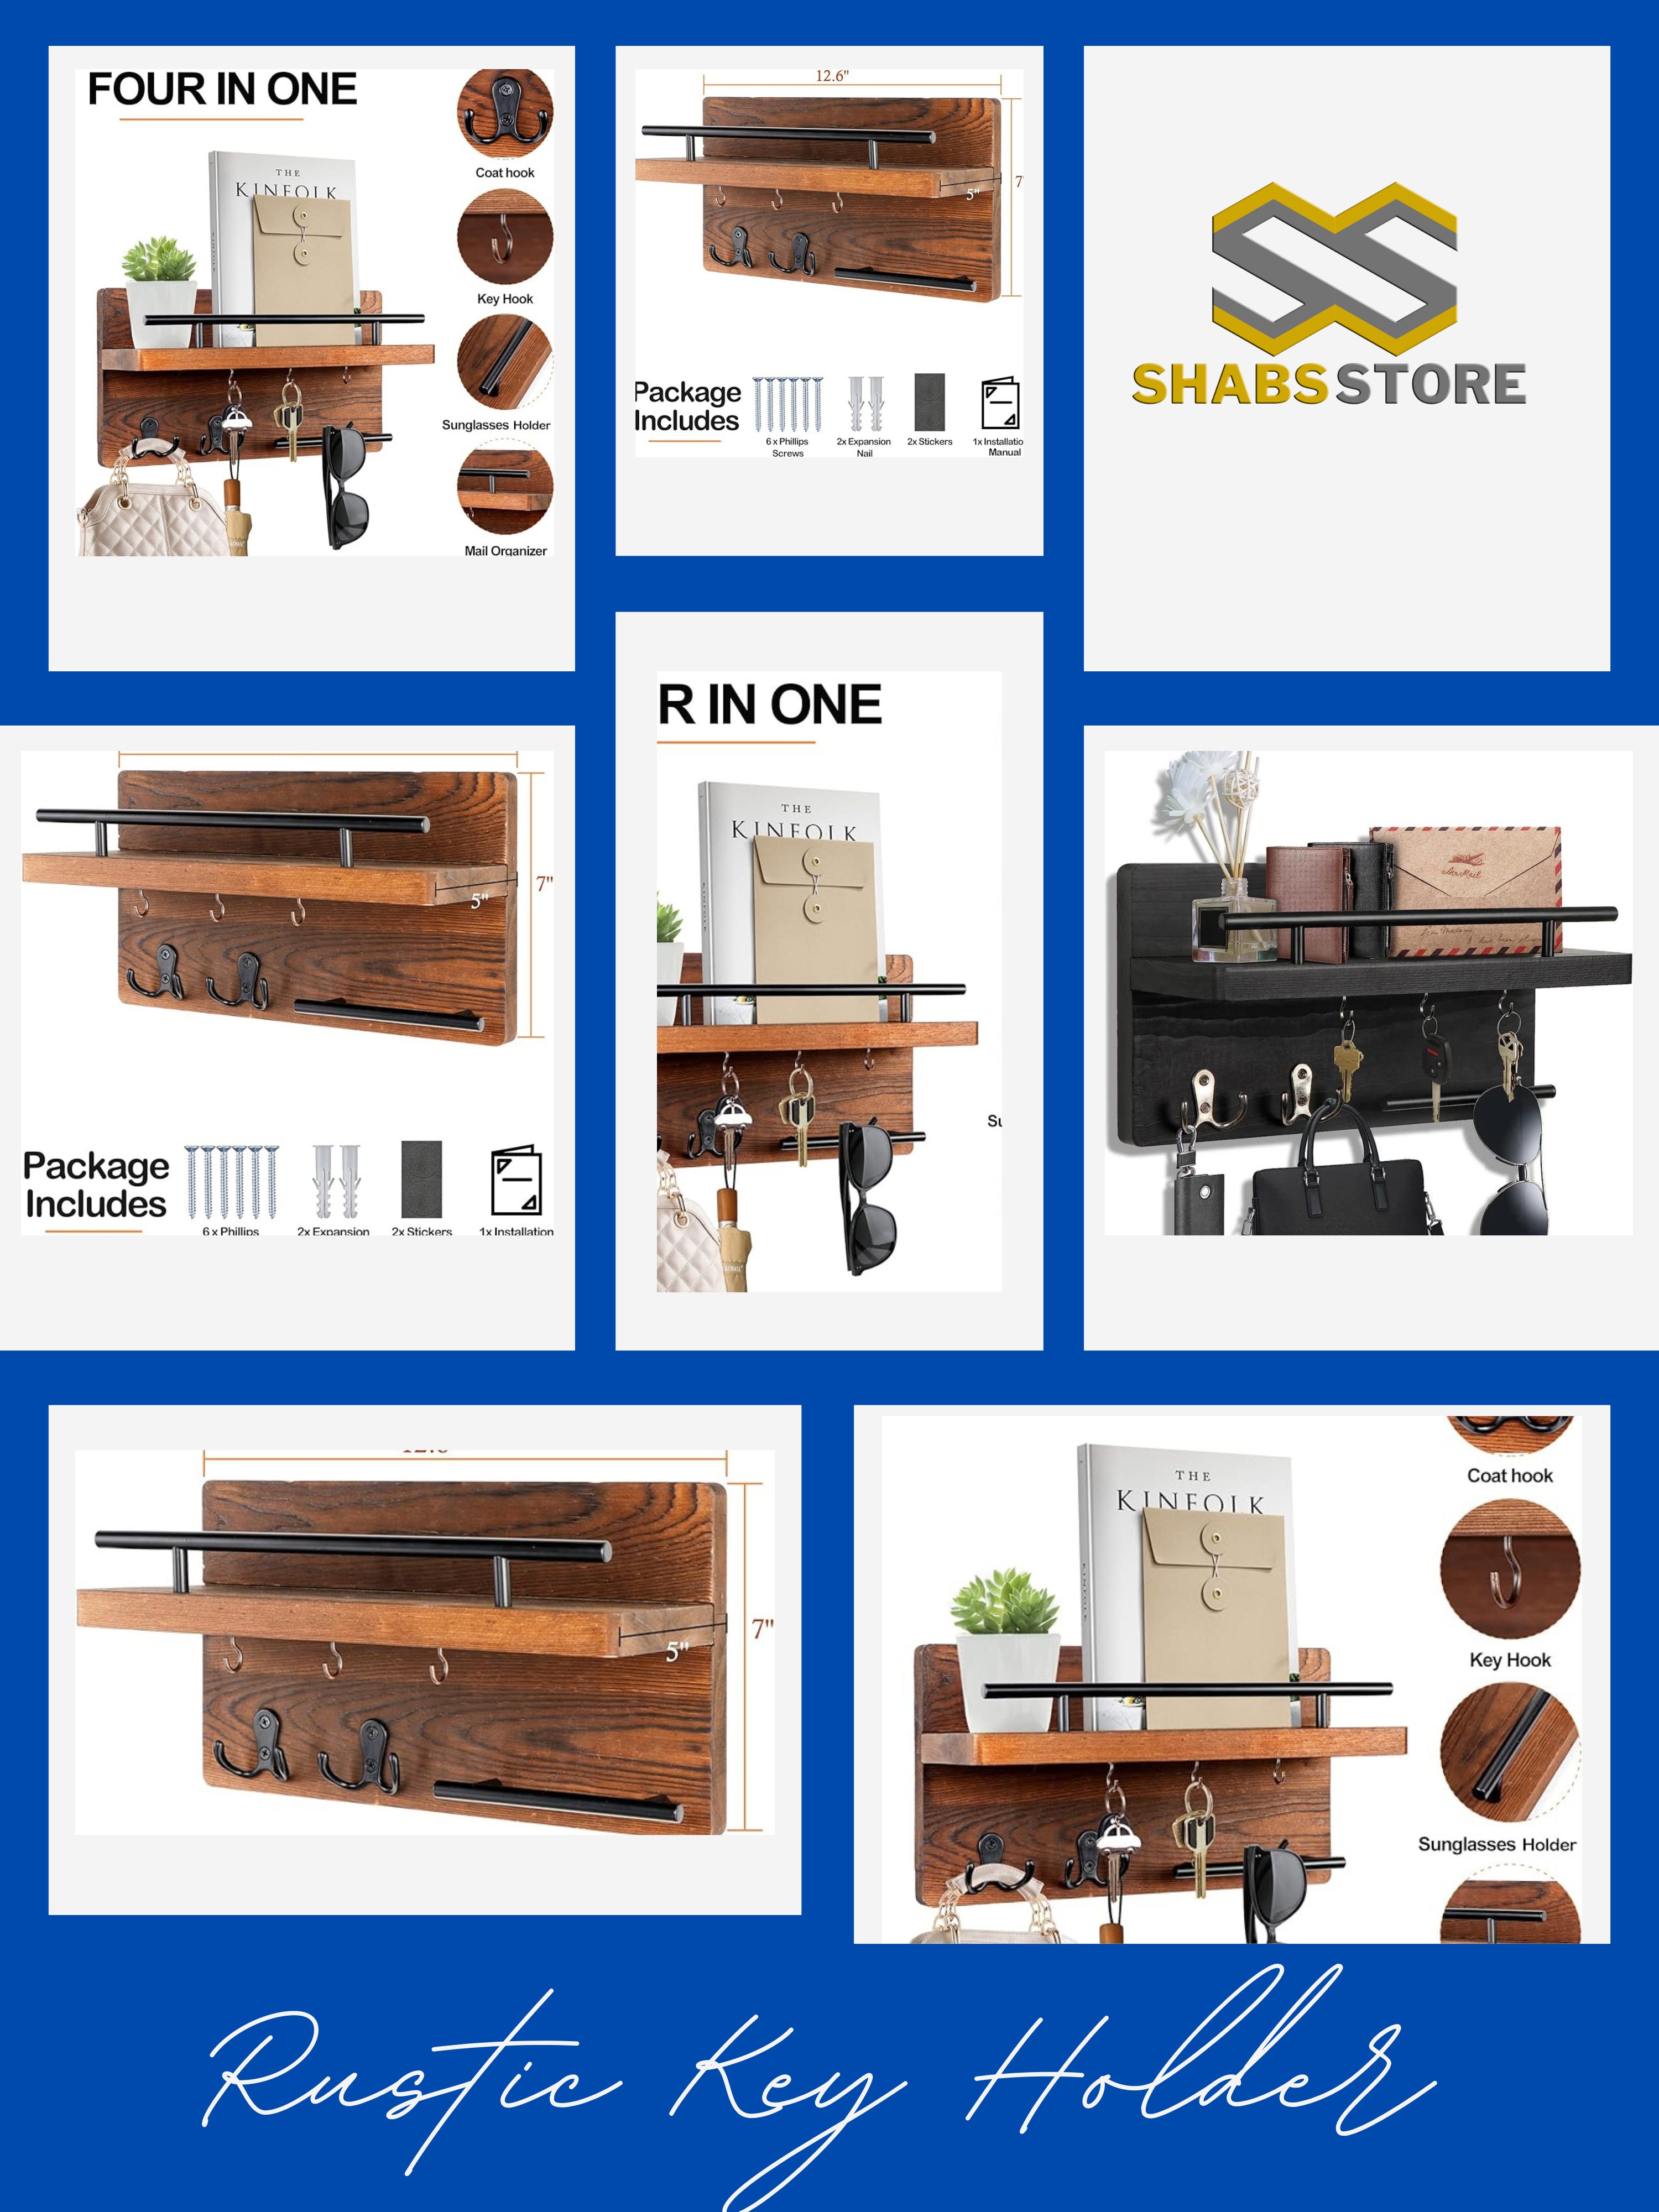
Elevate your home organization with our enchanting Wooden Wall Mounted Key Hanger. Crafted with precision and love, this exquisite piece seamlessly combines functionality with aesthetic charm. Say goodbye to frantic searches for misplaced keys as this elegant hanger provides a designated spot for your essentials, keeping them within easy reach. Its timeless wooden design adds a touch of rustic elegance to any space, while its sturdy construction ensures durability for years to come. Transform your entryway into a haven of organization and style with our Wooden Wall Mounted Key Hanger – because sometimes, the simplest solutions bring the greatest joys.
Welcome to the realm of effortless organization! Tired of cluttered desks and chaotic living spaces? Say hello to your new best friend: the Adjustable Desktop Storage Rack. Crafted to perfection, this ingenious solution seamlessly blends functionality with style, offering a sanctuary of order in the midst of chaos. Its adjustable design allows you to customize and adapt to your ever-changing needs, while its sleek form adds a touch of sophistication to any room. From pens to paperclips, from notebooks to knick-knacks, this rack effortlessly transforms your workspace into an oasis of productivity. Elevate your apartment living experience with the ultimate organization essential – because when everything has its place, inspiration flows freely.
Tired of tripping over scattered shoes the moment you step inside your home? It’s time to reclaim your space and style with our Wooden Shoe Rack. Crafted with elegance and functionality in mind, this sturdy yet stunning piece effortlessly blends into any decor, offering a sanctuary for your beloved footwear. Say goodbye to cluttered entryways and hello to organized bliss. Embrace the warmth of wood and the tranquility of tidiness with our Wooden Shoe Rack – where practicality meets aesthetic charm. Declutter your life, one step at a time
Welcome to the epitome of apartment organization! Say goodbye to cluttered floors and overstuffed closets with our must-have solutions. Introducing our ingenious Shoe Storage Ladder Rails and Garment Hanger, the dynamic duo designed to maximize space and style effortlessly. Elevate your living space with these sleek, space-saving wonders that not only keep your beloved shoes neatly displayed but also ensure your favorite garments hang with grace. Bid farewell to chaotic mornings spent hunting for the perfect pair or rummaging through crammed closets. With our innovative storage solutions, simplicity meets sophistication, transforming your apartment into a haven of organization and elegance. Say hello to a clutter-free life where every step is a delight and every outfit is effortlessly curated. Experience the magic of efficiency and charm with our Apartment Organization Must-Have – because an organized space is a happy space.
Welcome to the epitome of functional elegance! Introducing our Wooden Home Organization masterpiece: the Computer Desk with Storage Shelves. Crafted with precision and designed to elevate your workspace, this desk seamlessly blends style with practicality. With ample storage shelves, it transforms clutter into cohesion, providing sanctuary for your essentials while enhancing the aesthetic of your home or office. Whether you’re tackling tasks or unleashing creativity, this desk is your steadfast companion, offering a harmonious blend of form and function. Elevate your organization game with a touch of timeless sophistication – because your workspace deserves nothing less than excellence.
It can be difficult to remember keys in our day-to-day activities. Lost keys can cause annoyance and waste time looking for them. An easy way to keep your keys accessible and organized in your house is to use wall-mounted key hangers with key racks. You can quickly set up a working key storage system.
Easy-to-follow instructions are provided in this comprehensive guide to ensure a hassle-free installation of a wall-mounted key hanger with a key rack.
Step 1: Assemble Your Supplies
Before starting the installation, collect all required materials:
Wall-mounted key hanger with key rack
Screws or nails (included with the key hanger)
Screwdriver or hammer
Level
Pencil
Tape measure
Step 2: Select the perfect site
Choose a good spot to mount the key hanger on the key rack. The location should be convenient for you. Ideally, it should be close to the entrance or in the middle, where you can quickly get your keys.
Step 3: Determine the Mounting Points and Mark Them
Mark the locations on the wall where you want to mount the key hanger with a pencil and tape measure. Make sure the key hanger is level by drawing horizontal lines with a level to ensure precise placement.
Step 4: Get the Wall Surface Ready
Make sure the wall is clean and dry before attaching the key hanging. To guarantee a tight fit, use a moist cloth to remove any dust or dirt.
Step 5: Mount the key hanger and align it
Align the key hanger with the designated mounting points by holding it up against the wall. To make sure it’s straight and level, use a level. If you’re using screws, put them in the wall and through the key hanger’s pre-drilled holes. Hammer the nails into the designated spots if you’re using them.
Step 6: Fasten the key chain
To make sure the key hanger is properly fastened to the wall, tighten the screws or nails after mounting it. To avoid any swaying or instability, be sure that every screw or nail is tightened uniformly.
Step 7: Stability Test
To make sure the key hanger is firmly fastened to the wall, give it a little twist. Look for any indications of movement or instability. To increase stability, tighten the screws or nails furthermore if needed.
Step 8: Place Your Keys
It’s time to hang your keys now that the key hanger is firmly fixed. To keep your keys organized and neatly hung, use the hooks on the key rack. To facilitate finding keys, think about organizing them based on kind or purpose.
Step 9: Make your rack unique
Step 10: Appreciate Your Well-Ordered Key Storage
Take a moment to appreciate your wall-mounted key hanging with key rack after it has been fitted. Experience the ease of knowing that your keys are well-organized and at your fingertips anytime you need them.
Bid farewell to the aggravation of looking for missing keys!